
One of the great features of SharePoint is Alerts. Let’s say you have a lot of people storing a lot of documents in a lot of libraries in SharePoint. You want to know what’s going with the libraries and lists your responsible for, but you don’t have time to investigate them everyday to see what’s happened.
Enter SharePoint Alerts!
Alerts can be setup to send out an email when documents are added, deleted, or modified by anyone.
Here are the steps to setup alerts.
1. Configure Outgoing Email Settings
You need to setup the sending email in SharePoint’s Central Admin. Log in to the Central Admin site and navigate to System Settings -> Outgoing E-mail settings.
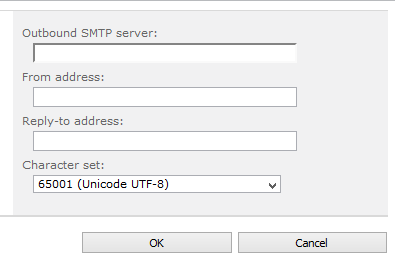 Outbound SMTP server: in a typical setting you’ll need to get this from your email host, but it will be similar to the outgoing email server used to set up your email account.
From address: The email address that should be the from account. For security reasons this account will need to be part of the SMTP server. In other words, if Yahoo is your email server, you won’t be able to send from a Google account.
Reply-to address: typically the same as the from address.
Character set: set this for your preferred language. The default is fine.
2. The Alert User Account
If you are setting up alerts individually you can skip this step. If you want to have one email account receive all the email alerts and you don’t want it to be your account, you need to set up an alert user account. In my scenario we are using SharePoint through DotNetNuke and pulling our users from DotNetNuke into SharePoint. We wanted the alerts to all go to a single account which could then be managed by another application that would update our DNN site automatically.
The problem in this case is that the users from DNN are not immediately recognized by SharePoint and you’ll get the dreaded “no specific user found” when trying to assign the user. To get around this you need to create a new user in Active Directory on the server that hosts SharePoint.
a. Create a new user in Active Directory on the SharePoint server making and then log in to SharePoint as an Admin.
b. Navigate to Site Actions -> Site Settings -> People and Groups.
c. Select the SharePoint Group that has contribute permissions.
d. Just above the list of users select New -> Add Users.
e. In the Grant Permissions dialog enter the username of your alert user and click OK.
f. From the user list click on your user and click Edit Item. Add in the email and click SAVE.
3. Set Up The Alert
Log in to SharePoint as the user who should receive the Alert. Select anything from the top level of the list all the way down to a single document; you can receive an alert from any level.
 Expand the Library ribbon and you should see the “Alert Me” icon. If you don’t see this icon it means that the Outbound Email Settings have not been set up.
After clicking the icon select “Set alert on this library”
Fill out the fields in the “New Alert” dialog and click OK.
You should now start receiving an email for the selected list, or document, on the selected Change Type events.